Setting up OBS to stream on Twitch can seem like a daunting task. If you have spent any time diving into bitrates, settings, and sources, it gets confusing quickly. We are here to help you break down the process step by step. We will be starting assuming you have already picked up OBS studio from Their Website. From here, we will cover settings, get some of your first sources added, and then even get some fancy graphics to help you stand out. FOR FREE!
Another article you may enjoy: 7 Easy Steps To Setting Up OBS for Content Creation
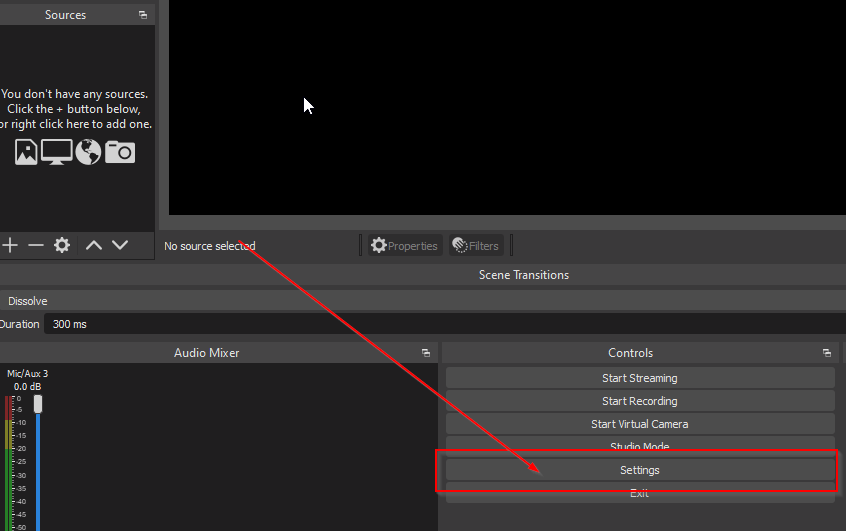
Open OBS Studio and find the settings panel near the bottom
Navigate to the settings tab at the bottom right of the application. Let’s peek at some of the advanced features to help get that image looking crisp.
From here, we want to cover the basics of bitrate. With your ISP, aka internet service provider, in mind, go to google and type in the name “upload speed” and your location. This process will give you an idea of your upload speed if you don’t know. As long as the upload speed here is higher than 6MB/s, we are going to be just fine ^_^
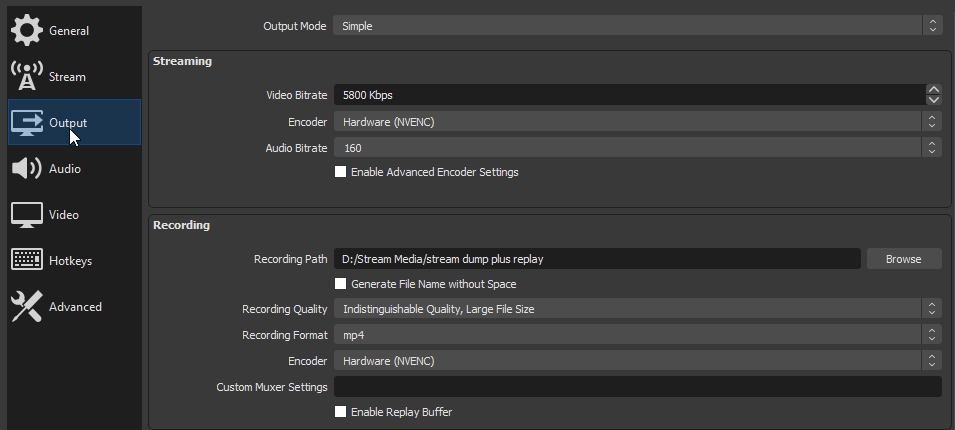
The basics of setting up OBS to stream on Twitch start at a bitrate up to 6000 K, six megabits per second. Anything over this will not get picked up by Twitch, so it’s best to stay under this number if possible. OBS allows you to set your resolution and output to fit within these bounds. I use 5800 to avoid connection drops and keep a stable connection to Twitch. The ideal number for 1080p/60FPS is 6500. Unfortunately, Twitch caps us at 6,000. I know, right?
Find the output section and keep it at the simple setup for now. Feel free to test between 5500 and 6000 Kbps bitrate and see what looks clean for the stream. You can go back and review your previous streams to see the video quality and judge for yourself.
Log in to Twitch
Here is the easiest part. We will log in to Twitch while still in the settings panel after editing the stream settings.

Set the drop-down menu to Twitch, and leave the server set to automatic. Next, click the “Connect Account” button below and log in with your Twitch account. If you need to make an account, you can do so here On Twitch by clicking the purple Sign Up box in the upper right. Then use your credentials to log in to Twitch with OBS Studio.
Add your first scene and your first source
Let’s add your first scene. Each scene is a collection of sources that we can add. Sources can be game captures, a video for when you grab a snack, or even the webcam for your audience to engage. You can select the scene add button (see below) and name it what you prefer, maybe “Rising Star”?

Next, add a source, hitting the add source plus symbol (see above). As I previously mentioned, we can add anything you like that will display the content you want to share. In my example, I will add a video capture device for my AVerMedia Live Gamer 4k, seen here.

You can name the device whatever you would like, then click next to get to the properties screen, shown below.

You can leave the settings on default to handle most use cases. If you use old game consoles, advanced video transitions, or nested scenes, the settings may need to be adjusted in OBS studio sources to make it appear correctly. We will cover those later. Now, Let’s add an overlay.
Setting up your first overlay
We will show you how to set up an overlay by adding another source. Wait, but I need an overlay, right? Check out Our Marketplace for tons of free overlays and transitions to boost your production value. I decided to go with the Cyber Punk’d option from the artist Digital Olimon Designs.
My hierarchy exists as a folder on my secondary hard drive containing all my stream files. I organize by OBS, Media/Clips, Branding, Bots, and Documents. This helps me to stay organized and could help you too. Start by unpacking the file of your choice where you would like to and remember where it’s stored.
Go back into OBS Studio and click the add source button again. When the source is animated, it will need to be added as a media source. When using a static image that doesn’t move, add it as an image source.

Now you should have your OBS studio preview scene look something like this below.

You can now repeat adding a source and your webcam to the stream. Remember, all the sources you add will need to be layered so that the top image, like our webcam frame, is above the actual camera source. This image will help you understand the build process for your overlays.

There you have it. Now you know how to setup OBS to stream on twitch, find free overlays here at The Franswah Studio, and begin your journey fighting your way up the ranks as a content creator. What game do you plan on streaming to Twitch first? Tell us in the comments below.





1 Comment. Leave new
[…] The Basics Of Setting Up OBS To Stream On Twitch10 Best Microphones For Streaming in 2022Discord vs Guilded: 5 Reasons Guilded is Better […]