
What is Voicemeeter?
Voicemeeter, Voicemeeter Banana, and Voicemeeter Potato are Virtual Audio Mixers developed by VB-Audio. These Mixers act much like a normal analogue mixer except they exist virtually on your computer. There are many ways to setup Voicemeeter and no one way is more objective than the next. However, there are some things that make certain setups superior to others. I have created a very in-depth “how-to setup voicemeeter” video linked below. In this post I will explain how to setup voicemeeter in the way I suggest setting it up as a professional.
What to download?
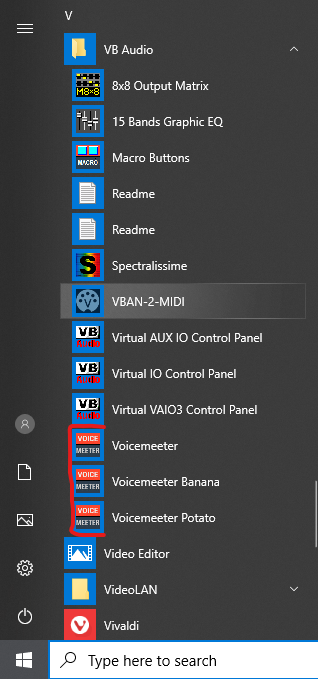
The first thing you want to do is grab all of the downloads to get Voicemeeter running properly. Keep in mind when downloading any of the voicemeeter applications you will have downloaded all versions of the app. In order to open the correct app you will need to open you Start Menu (Windows Icon Bottom Left) and find the VB-Audio Folder.
Downloads:
Voicemeeter
Virtual Audio Cable
EarTrumpet
Menu Options
Let’s first make our lives easier by telling Voicemeeter to open every time we turn on our computer. If you left click on the Menu you will sett and options for ‘System Tray (Run at Startup).’ Make sure this is toggled on so every time we start our computer it will turn on Voicemeeter aswell. You can also set it to show the Voicemeeter Application on startup in case you need it open.
Setting up Hardware Inputs
There are 4 main sections on Voicemeeter. You have Hardware Inputs, Virtual Inputs, the Master Section, and Hardware Ouputs.
The left side of the application is where you will find the Hardware Inputs on Voicemeeter. On Voicemeeter Potato there are a total of 5 hardware inputs. These inputs allow you to select hardware on your computer. This is where we will select our microphone source.
Ad Below Helps Fund The Site
 I suggest setting up your microphone on the Hardware Input 1. Simply left click on the “Hardware Input 1” Title and select your microphone from the drop down.
You will notice I have my Hardware Inputs labeled with “Microphone, and Browser.” If you right-click on the title you can change the name to match what you have setup.
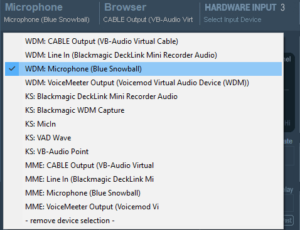
Next, we want to setup our Browser audio on the Hardware Input 2. What we use to do this is EarTrumpet and the Virtual Audio Cable. In the dropdown for Hardware Input 2 lets select the ‘CABLE OUTPUT (VB-Audio Virtual Cable)’ source.
With EarTrumpet installed you can route the audio from your browser over to the Virtual Audio cable. This is where things start to get a little more complex. I will do my best to explain the setup with EarTrumpet. On the bottom right of Windows there is an ‘Arrow Button’ Next to your Speaker Icon.. This shows you all of the applications that are currently running in the background. If you click that ‘Arrow Button’ you will see a Speaker Icon within the running applications (EarTrumpet Must be installed). If you click that Speaker Icon it will open EarTrumpet. This will be a two step process.. 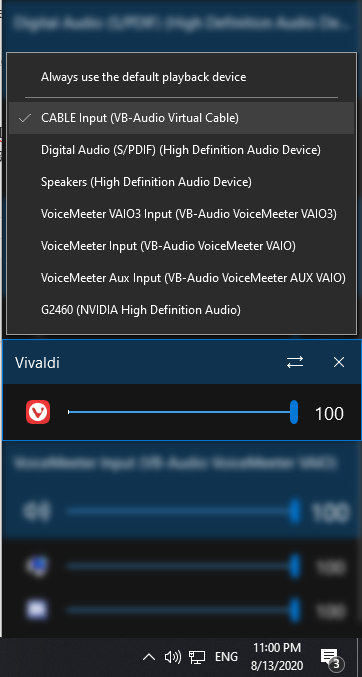 Step 1: Make sure your Browser is open and Audio is traveling through the browser. (Open YouTube or Play music)
Step 2: Find the Web Browser Icon in EarTrumpet. Right-Click that Icon, Click the Double Arrow, and select the ‘CABLE INPUT (VB-Audio Virtual Cable)’
This will ensure the audio from our Browser is traveling to our Hardware Input 2. This is where we selected the Virtual Audio Cable as our input.
Ad Below Helps Fund The Site
Setting up Hardware Outputs
After setting up EarTrumpet for our Browser, and setting up our microphone on Hardware Input 1, we are ready to setup our Hardware Outputs.

The Hardware Output section is linked to Hardware on our computer. In this Section we can select Hardware on our PC to route our Hardware Inputs and Virtual Inputs to. So, we will hit the drop-down for the A1 selection and select our Main Output device (Speakers, Headphones, etc). On Voicemeeter Potato you can select up to 5 Output devices on your PC. The Base version allows you to select 1, and the Banana version allows you to select 3. The reason we need to setup our hardware outputs at this point is to ensure that we have audio on our PC once we make changes to our Playback and Recording Devices on the PC. Under each one of the Hardware Inputs and Virtual Inputs you will notice selections for the A1-A5 sources. We want to make sure anything we want to hear has the A1 source enabled. You probably want to un-toggle A1 beneath the Microphone, but leave A1 toggled beneath our Browser source. You will want A1 toggled for all 3 of your Virtual Inputs aswell.
Setting up our Virtual Inputs
With our Hardware Outputs selected we are ready to send our desktop audio into Voicemeeter. If you haven’t set your systems playback devices before I will quickly walk you through that process. In order to do this we need to navigate to our Sound Control Panel. If you Right-Click on the Speaker Icon (Bottom Right) on your system you will see an option for ‘Open Sound Settings.’ On the Sound Settings window scroll down until you find Related Settings. This is where you will find the Sound Control Panel.
Within the Sound Control Panel window you will see Tabs for Playback, Recording, Sounds, Communications. We will cover the Playback and Recording devices.
Playback Devices
In the Playback Devices Tab lets set the following settings: Default Device – Voicemeeter Input (VB-Audio Voicemeeter VAIO)
Default Communication Device – Voicemeeter Aux Input (VB-Audio Voicemeeter AUX VAIO) Right-click on Voicemeeter Input (VB-Audio Voicemeeter VAIO) and select Default Device. Do the same for the Voicemeeter Aux selection except set it as your Default Communications Device. If done correctly it will look like what you see on the Image displayed here. This will tell Windows to send our System sounds to the Voicemeeter Input aka Virtual Input 1, and our communication audio to Voicemeeter AUX Input aka Virtual Input 2.
Recording Devices
In the Recording Devices Tab let’s go ahead and set our Default Device and Default Communication Device.
We want both Default Device and Default Communication devices to be the same source. What I suggest is selecting the Voicemeeter AUX Output source. This will be our B2 selection on Voicemeeter. So, anything we have routed to B2 will be routed through our Default Recording Device..
What is the Default Recording Device?
The Default Recording device is going to tell windows what source to set as the default Input device on applications. So, whenever you open a new game or new communication application you will have this device selected as the input. So, once we set this device as our default recording device we will also want to make sure the B2 button is toggled beneath the Microphone source on Voicemeeter. This will ensure our Microphone gets routed through Voicemeeter and into every application.
Virtual Input 3
We now have successfully routed audio to 2 of our Virtual Inputs. We have routed our desktop audio (Games, Apps, etc) to our Virtual Input 1. This excludes the Browser audio we separated earlier. We have also separated our communication audio (Discord, Skype, Game Comm’s, etc) to our virtual input 2. Now we are ready to route our music audio to the virtual input 3.
In order to do this we are going to use EarTrumpet again! We need to send our Music Application audio over to the Voicemeeter VAIO3 Input this is our Virtual Input 3. Some Music applications have their own Audio Output settings, and if so you should set the output there. But, if you use Spotify, like the majority of music listeners then you will need to use EarTrumpet.
Ad Below Helps Fund The Site
Summary
In summary, we have routed 5 sources over to Voicemeeter giving us more control of each source. We have routed out Microphone to Hardware Input 1, and then onto B2 our Voicemeeter AUX Output source. We utilized out Virtual Audio Cable by routing our Browser Audio over to Hardware Input 2. And then we broke up Dekstop, Communication, and Music audio in Virtual Input 1 through 3!
I hope you guys enjoy the setup! If you need further help feel free to check out our Forum or head over to the community Discord for assistance!


3 Comments. Leave new
Wow, this was a good article
Really helpful!
[…] matter which version of Voicemeeter you have, no matter what mic you have the setup is exactly the same. It only requires a few steps […]