
Why Separate your Audio Sources in OBS?
Separating audio sources in OBS will give you control of the audio you have on your stream. If you livestream having a high quality audio experience is important for your viewers. The best way to accomplish a high quality audio experience is by maximizing the amount of control you have over each individual source of audio on your stream. In this blog I will show you how to separate the audio in OBS using Voicemeeter.
What you need to do
Before reading through this blog you need to be sure you have setup Voicemeeter the way I suggest. This blog would be terribly lengthy if I also explained how to setup Voicemeeter. So, go ahead and read -> How-To Setup Voicemeeter Correctly! (Banana & Potato) before we continue.
Want to watch a video Instead?
Setting up Audio Sources in OBS
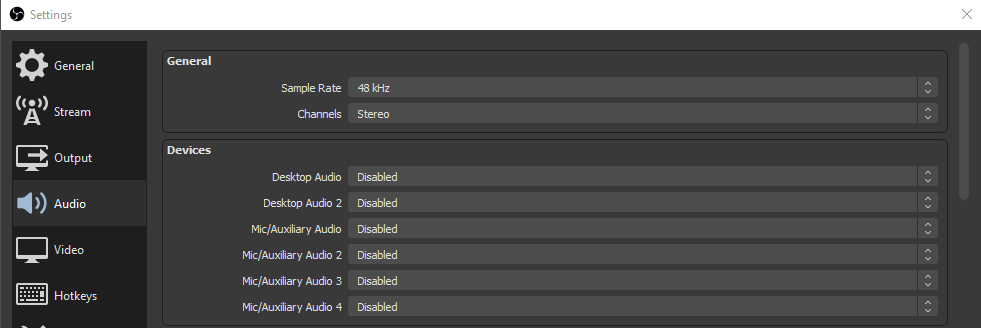
OBS has audio setup for you by default. You can find these audio selections within the Settings of the application. I suggest you navigate to the audio section of the settings and disabling each of the defaulted sources. Why do we do this? In order to have maximum control over the audio on your stream you will want to have the option between having different audio sources on each scene for your stream.
By disabling the defaulted sources we then can setup audio sources in each one of our scenes to increase the amount of control we have!
So lets get started!
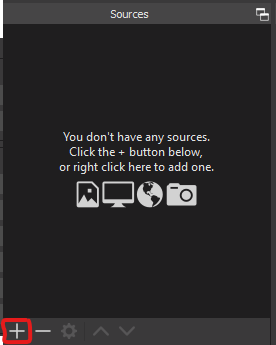
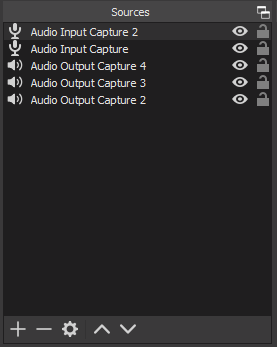
In every scene in OBS you have the option to setup Sources for that Scene. What we are going to do is setup 3 Audio Output Capture Sources and 2 Audio Input Captures. This will allow us to route the audio from our Virtual Inputs and Hardware Inputs on Voicemeeter. This is assuming you have setup the same sources as I have in my guide to Settting up Voicemeeter.
It gets pretty simple to setup the rest after this. What we need to do is link each one of these sources to our sources on Voicemeeter. After following the Voicemeeter Setup Guides you will have routed Desktop audio to Voicemeeter Input. Communication audio to the Voicemeeter AUX Input source. And, Music audio to Voicemeeter VAIO3 Input. These inputs can be utilized as Output Captures in OBS. So, lets go ahead and set each source obs with the appropriate source from Voicemeeter.
Setting up Audio Output Sources
Step One
Right-Click on the Audio Output Capture Sources -> Go to Properties
Step Two
Set the source to each Virtual Input:
– Voicemeeter Input (VB-Audio Voicemeeter VAIO)
– Voicemeeter AUX Input (VB-Audio Voicemeeter AUX VAIO)
– Voicemeeter VAIO3 Input (VB-Audio Voicemeeter VAIO3)
Step Three
Rename each source to match the audio. Right-Click Audio Output Capture -> Rename
Step Four
Set the Names to the Following:
– Desktop Audio
– Communications
– Music
Desktop = Voicemeeter Input
Communications = Voicemeeter AUX Input
Music = Voicemeeter VAIO3 Input
Setting up Audio Input Sources
Our last two sources are going to be routed for our Microphone and Browser audio. Our Microphone audio is either routed directly into OBS, or routed through voicemeeter to a virtual output. And, our Browser Audio is routed to the Virtual Audio Cable. So, we will want to follow the steps above again and setup these captures for these sources.
Microphone -> If routed through Voicemeeter it will be linked to the Voicemeeter AUX Output (VB-Audio Voicemeeter AUX VAIO) source.
Browser -> Cable Output (VB-Audio Virtual Audio Cable)
Lets make our lives easier
You will want to be sure each scene has the audio sources you need. The easiest way to go about doing this is by Grouping the audio sources together. This will allow us to Copy & Paste the sources from this scene into our other scenes. To group elements together you will hold down on ctrl + left click on each source until they are all highlighted. Once they are highlighted you can right-click and select Group Selected Items.
To copy and paste this group to our other scenes we will right-click the group we just created and paste that group into each scene. You will notice you have options to paste as a Duplicate or a Reference. A Reference will be the SAME source as the source you copied.. whereas a duplicate will create a NEW group of audio. I suggest pasting as duplicates, but keep in mind when you edit the audio for one scene it won’t take effect in the other scenes.
Summary
After setting up these sources in OBS we have successfully separated all of our audio sources. Now you can consider applying filters to each source to give your stream a level of consistency you’ve never experienced before!


