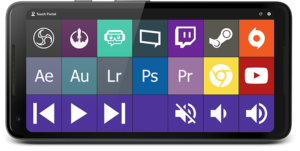
Have you ever wanted to setup a soundboard, but weren’t sure where to start? Soundboards are great after all. They can be used for Twitch streaming, YouTube content creation, podcasting, D&D gaming. You get the idea. Anything where quick access to soundbites might improve the activity. The problem usually is the cost. The Elgato Stream Deck is expensive. Attempting to set one up yourself may require coding knowledge you have no time or desire to learn. If you’re looking for an easy solution for sound effects and so much more, look no further than Touch Portal.
The idea behind Touch Portal is simple, especially from the viewpoint of a content creator. Download an app to your tablet or phone, install the companion app on your PC (or Mac!), then setup the soundboard on your PC and use it on your tablet. The best part is that this is absolutely free! Now, that is not without restrictions, but the limitations are so relaxed you will have ample opportunity to test the best features of the app and visit the helpful community to see if you like it, without ever investing a dime. And when you do inevitably decide to take that plunge? You can have full access to Touch Portal Pro, with a lifetime license, for only $12.99. That is basically 10% the price of the Elgato and a much better value overall! So read on and let’s set one up. Here’s where to go to get started, plus some example downloads to get you started with your soundboard:
Ad below helps fund the site 🙂
You may have noticed that last link is the Touch Portal pages we will be creating in this tutorial. Those are completely configured to work right away, you simply need to ensure the path to the sound files and icons are correct. Following the directions below is the manual creation of the pages offered to you on the website. If you want to learn how to set those pages up yourself, then read on!
Okay, go ahead and install a client on your PC or Mac and also on your phone or tablet. You might already know this, but TheFranswah Studio Discord server has a helpful community of volunteers willing to answer any questions you might have about any issues you face, whether with Touch Portal or other PC-related problems. If you run into trouble, please do stop in. Come join the community even if you don’t need help, because it’s a great place to keep up to date on so much news about streaming and content creation. There’s also a Guilded server that does the same, but in a cooler fashion! Don’t know what Guilded is? There’s a blog post for that!
At this point, we assume you’ve gotten through the install and have the program opened on your PC and mobile device, and they’re both connected. We’ll also assume you downloaded the icons and sound effects that were linked and also unzipped them. With the free version of Touch Portal, you are restricted to 2 pages of icons, with each page being 2 rows with 4 icons per row. Touch Portal Pro unlocks an unlimited number of pages for icons, allowing adjustable grid sizes for icons per row! Add in further customization with individual pages for background and button color and the ability to use more complicated trigger phrases, you may soon understand how Touch Portal is better than an Elgato Stream Deck. But this is a How-to, not a review.
Ad below helps fund the site 🙂
Adding The First Sound Effect
Let’s add your first button to play a sound file! Just follow these quick steps:
- Click on any of the empty squares within the desktop application
- In the new window, type ‘play’ in the search box and choose the ‘Play Audio’ option beneath the Media Functions heading
- In the file window that appears, click the choose button, then navigate to your desired sound effect audio file and click add (note, the following formats are valid audio files: MP3, AIFF, WAV, MPEG-4 AAC)
- On right side of ‘edit touch button’ window, scroll down to Button Image options and click ‘change icon’, then choose either from your computer or from the provided icon packs
- Navigate to the desired icon picture, whether your own or the one you unzipped from the downloads, then click add
- Press save on the ‘edit touch button’ window, then the icon will show on the main page along with the ‘Goto Main’ button
And that’s the simple setup for a button on Touch Portal. You can repeat that process for all the sound effects you want to use, or we can add a little bit more complexity on it. What we’ll do now is change the button to turn on or off the sound effect.
Advanced Tricks!
Using the button just created, do the following, and I know it’s a lot of steps, but they’re fairly simple to perform, even for a non-techie:
- Click the newly-created button and in the search box, type ‘if statement’ and select it
- Drag purple ‘play audio’ command to move into the ‘if statement’ block
- Change top block to say ‘if this button state is off’
- In the search box, type ‘change button state’ and select that exact option
- Drag the newly added box to be above the purple ‘play audio’ box but still within the green ‘if statement’ box and ensure it says ‘set button state to on’
- In the search box, type ‘wait’ and choose the ‘wait for timer’ option, then drag that to be below the purple ‘play audio’ box and choose an appropriate length of time
- Insert one more ‘button state’ change below the wait command, selecting it to be off
- Type ‘else’ into the search box and insert it, dragging it below the wait command and above the ‘end if’
- type ‘stop audio’ into the search box and insert it below the else statement
- insert another ‘set button state’ below the ‘stop all playing audio’ command, and set button state to off
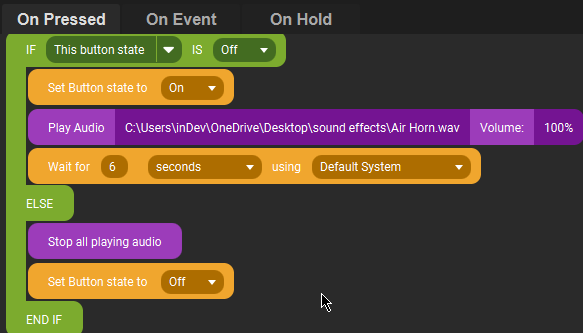
From here, you can right-click the button and copy it, then paste it into all the blank areas on that page. This will take care of most of the configuration of each sound effect button for you. What you’ll do next is go into each button and change both the audio file and the icon. To change the audio file, double-click the purple box with the left mouse button and choose a new sound file. To change the button icon, scroll down the right side of the page and find the ‘Button Image’ and ‘change icon’ buttons as described in step 4 of the first section above. At this point, you might also consider changing the exact wait time you want for each button sound effect too. Congratulations, you’ve done it! At this point, you can take your soundboard and test it out. But if you want to know some extra cool tricks to get more use from each page, then read on!
Ad below helps fund the site 🙂
Even More Advanced Tricks!
For this “advanced” Touch Portal training, you should have a form of on/off icons available for your use. We need to set a value for this page with all the icons, to allow this trick to work. What that basically means is the buttons you press will do different things at different times. The on/off icons will help you differentiate when. Here’s what you do:
- From Touch Portal main menu, select ‘Values’ on left side of screen, then click ‘Add Value’
- For the Id field, enter the label ‘Soundboard’; in the name field, enter ‘Sound Board’; in Default value field, enter ‘1’, then click save
- Select the page full of icons and click on a blank square within it, using the search box to insert a ‘set value’ command, choosing ‘Sound Board’ for set value with id and setting the value to 1
- Select the first of the paired on/off icons mentioned earlier using the ‘change icon’ Button Image option previously mentioned and then press Add
- Click the ‘On Event’ tab within the ‘Edit Touch Button’ and insert a ‘when value changes’ command, specifying ‘Sound Board‘ in the first box and ‘1’ in the third box (leave second box/’changes to’ as is), so that it reads ‘When the Value Sound Board changes to 1’
- Add a ‘change button visuals’ command, selecting the ‘change icon to’ checkbox and selecting the icon from step 3, then press ‘Add’ to confirm the icon change, and press ‘Add’ again on the ‘Change Button Visuals’ to commit the changes; ensure the purple box is within the green one, otherwise the command will not work
- Hold down the control key and click on both the green and purple commands to select them both, then right-click copy and paste to insert a duplicate code block, changing the middle section this time to read ‘does not change to’; you’ll also go into the settings for this second code block and change the icon to the second, and as of yet unused, pairing of the on/off icon
- Ensure your changes are saved and return to the Touch Portal home page, where you will see the new icon on the page
Ad below helps fund the site 🙂
Explanation and Final Steps
Why did we just do this? Because you can greatly increase the usage of each page, even allowing you to bypass some of the Touch Portal restrictions in the free version. How does that work? Each button represents a state the sound effects board is in, either state 1, state 2 or state 3. And you can tell which state is which based on the on or off status of the icons we used. In each of the different states, the actual sound effects buttons on that page will play different sounds. so by sacrificing 3 spots on the page for each of the different states, spots which could have gone to actual sound effects, you are actually granting the remaining sound effects the ability to play 3 different sounds, so it’s ultimately a great net gain! But we’re not done just yet setting this all up, because right now, the extra sounds each button can play are not set up, so let’s do that!
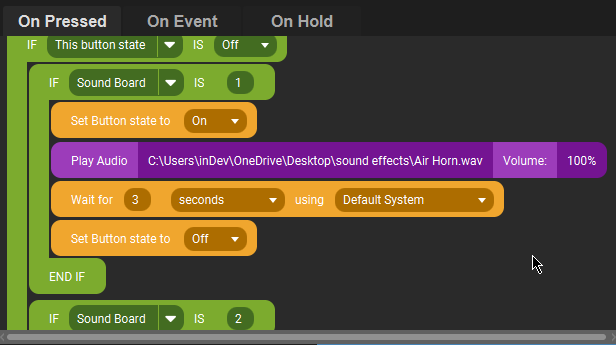
- Within the first sound effect button, add an if statement, click the dropdown arrow and choose ‘values’ then ‘Sound Board’ from the list; add a 1 in the second box
- Drag that if statement to be below the top, already established if statement reading “if this button state is off”, and drag the “end if” statement to be above the existing ‘else’ statement (the if statement green box should have 4 commands nestled within it)
- control+click on the if statement and everything within to select it (6 total items), right-click and choose ‘copy selected items’, then paste them
- Again, drag all the blocks in this code upward so that they are between the existing ‘else’ statement and the first ‘end if’, and alter the if statement here to read “if sound board is 2”, as you did in step 1 above; also ensure the button state commands match the original settings (first one says on, second one says off)
- Repeat steps 3 and 4, except alter the if statement to read “if sound board is 3” this time
- Now go into the 2 newly added blocks of code and select the desired sound effects to play when states are switched, otherwise the same effect will play no matter the state selected
That’s it! Now when you press one of the 3 icons to change state, both the sound effect and the sound effect icon will change and play different sounds! That means even with the limitations of the free Touch Portal, on a page with 8 icons, you can have up to 5 that are dedicated to play 3 different sounds, giving you a total of 15 sound effects! And the true beauty of a setup like that is that you can run Touch Portal on any portable device that meets the minimum requirements of the app, screen size won’t be such a worry! At this point, you’re pretty much a Touch Portal pro yourself, but if you find yourself still having questions about this process or even if you’re just wondering whether Touch Portal is worth the investment, come stop by our Guilded or Discord servers. They’ve been linked already and here they are again:
Thanks for reading, I hope you learned something from this one! Let us know in the comments what you thought and what you might like to know going forward!

