But first, what is markdown language? Maybe you’ve heard it before, maybe not. It is quite common but not much talked about because HTML exists. And you’ve most certainly heard of HTML. If you haven’t, please leave a comment below because I really want to hear your story. Markdown is essentially HTML for places that HTML doesn’t work. Like in Discord. But don’t get intimidated, there’s no need to learn complicated code like what comprises HTML. Don’t believe it? Take a look at the “code” required to use Markdown!
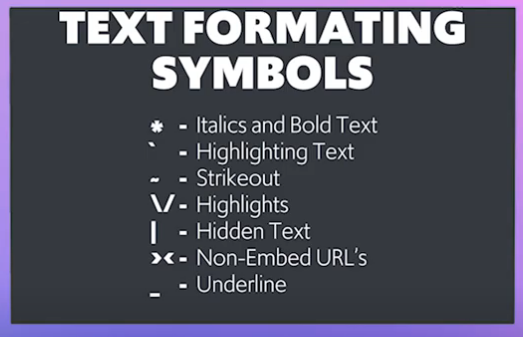
That’s it! Just a bunch of symbols that will create quite the impression for others reading your text! And the cool thing is it works pretty much the same in all those places, so the stuff you learn here you can take with you to other Markdown-compatible apps! Now let’s discuss how to use them properly!
Up first, we’ll tackle asterisks! Those are the star symbols, created by holding down the shift key and pressing the number 8. For those who don’t know, you don’t need to press them at the same time. You can have the shift key held down with one finger/hand and while doing that, press the number 8. Or just use the asterisk key on the keyboard, if you have the number pad on your keyboard! Open Discord and try this first one out now! There are three ways to use them, and we’ll cover all of them right now!
Using one set of asterisks on either side of the words you’re typing will make those words bold. That is, this will create bold text in Discord. Don’t worry though, those asterisks will NOT show up in the finished statement! Now if you use two sets of asterisks on either side of your text, you’ll create italicized words! If you’re unfamiliar with the term ‘italicized’, that’s those slightly slanted words typically used for emphasis or maybe actions in a text-based roleplay Discord server. Just like this! Want to bolden AND italicize your text? That’s nearly as simple as the first two steps! Just add a third asterisk on either side! This is how we do it! Still aren’t sure you understand? Just look at the animated image below!

Also of note but not shown in this article is the ability to strikeout text by using two tildes on either side of the text and underlining text by using two underscores on either side. Don’t know where the tilde or underscore keys are? Tilde is found by pressing the key next to the 1 key at the top left of the keyboard while holding down shift. Underscore is found next to the zero, holding down shift while pressing the hyphen/dash key. At least on a standard US Keyboard layout. Sorry non-Americans, but those keys may be somewhere different for you and I don’t know where!
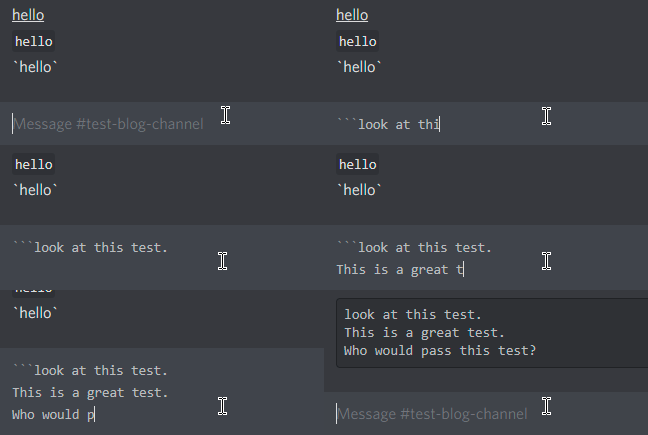
Okay, now we’re going to use a key called the ‘acute’ or ‘grave’ key. Don’t know where to find it? Remember the tilde key I just mentioned? Don’t hold down shift when you press the tilde key and you’ll make an acute mark instead! Adding one acute/grave mark on either side of your text, just like this, causes that text to be highlighted. If you are using it for a code block, or just want a larger highlighted block, use THREE marks to start and when you press enter, instead of sending your text you will simply add a new line. This also extends the highlighting across the entire line, even past your words. When you’re ready to end your statement, add the second set of three marks and the enter key will resume its purpose of sending your text through Discord! Not quite getting it yet? No problem, just look at the image below!
Have you wondered how you can hide your text behind a spoiler tag? That’s what the pipe is for! No, that’s not drug paraphernalia we’re hinting at. The pipe key on your keyboard is above the enter key, sharing space with the backslash key. Hold down shift then press that key and you’ll get the pipe! Place two of those on either side of your text, and anything between them will be covered by a black box that has to be clicked on to be removed. A spoiler tag! Isn’t that something?
Now if you want to give your text an embedded look, you can use the ‘greater than’ key. That’s the key shared with the period, and as with the other shared keys, you hold down shift and then press the key to get it to work. Just add a space after the symbol but before you start typing and it’ll change to the embedded look we’re discussing.
All right, let’s move onto the final and most complicated lesson of this tutorial; Color text! Fair warning, this one is complicated but again, we’ll get through it! But if you already have questions, come join us on the Discord server where there’s a dedicated Discord support channel for the community volunteers can assist you! Also, this does not work on mobile but everything we’ve discussed until now will work. The main difference is on the PC app, it will give you a preview in the text entry box before you send but on mobile it will not.
Before we get into specifics, here’s a quick image showing the 7 different ways/languages you can colorize text. Each one has a different use, and admittedly the syntax is confusing at first, but you’ll soon be an expert with it and amazing all your friends!
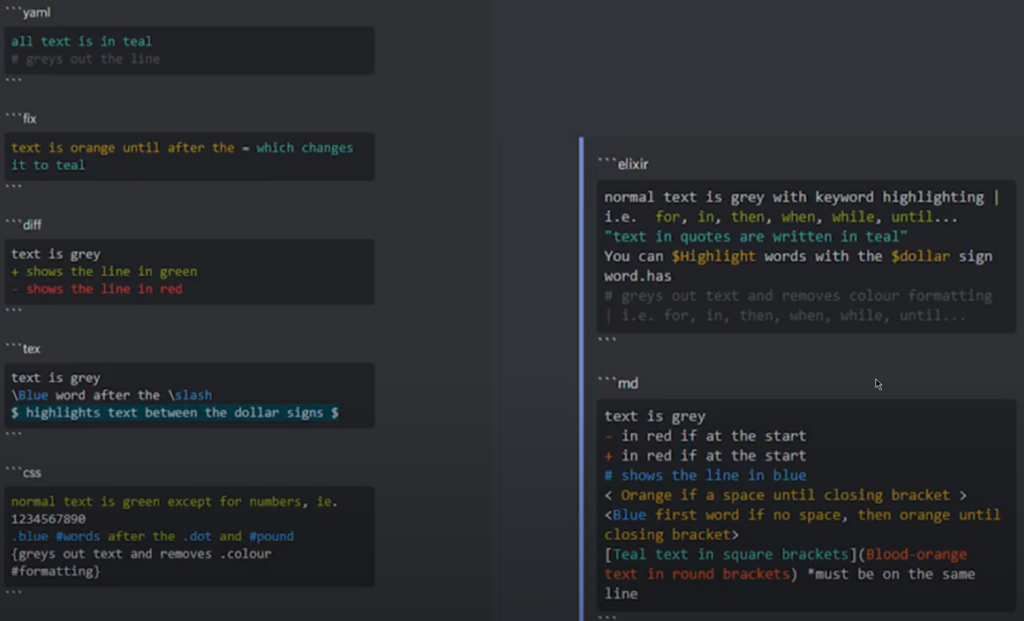
As you can see in the image, you need to place three acute/grave marks before and after any text blocks you want to change. The second step is, after placing your first 3 acute marks, to put in the name of the language you’d like to use from the list of the seven available. It is case-sensitive, so don’t use uppercase letters and don’t add a space after typing the language or that will break the effect as well. If you can’t see the image too well, check out the YouTube video! Here’s the breakdown of each language.
- yaml – causes text to turn teal, but you can gray out text by preceding it with a pound sign/hashtag
- fix – causes text to show as orange, until you add an equal sign and then it will turn teal
- diff – all text preceded by a plus sign will show as green, all text preceded by a minus/negative will show as red. Any text without either symbol will simply be gray
- tex – This one actually doesn’t work anymore, so don’t use it
- css – normal text comes across as green, like in the plus sign diff language; however numbers are grey and anything preceded by a hashtag or period comes across as blue; curly brackets will remove color formatting entirely
- elixir – normal text is gray, but certain words come across highlighted in green and anything in quotes will display as teal, while anything preceded by a hashtag will be entirely grayed out
- md – again, normal text is gray but anything preceded by a hashtag will be blue, if using html brackets the first word will be blue then the rest will be orange until you close the brackets; using square brackets for one set of text, followed by round brackets in another set of text causes the set of text in the square brackets to show as teal and the text in the round brackets to show as red-orange, so long as it’s on the same line
Got all that? Of course you do. But if you don’t, please come join the Franswah Community Discord server (how many times can I link this invite in one article? A lot!)!
So that isn’t all the available methods of coloring text, but this is the beginner edition of the Markdown guide. You can find the rest on the Discord server (no link this time, lol) using the command “?colour_syntax” in the bot-commands channel. You can also go there to ask for help on a variety of issues, both Discord and non-Discord related! Issues such as audio, streaming, OBS and VoiceMeeter. Plus more! Stop on by to see them all! If you’re stuck around for this long, thank you for reading. I really hope you’ve enjoyed this. Please let us know in the comments whether you enjoyed it or not, maybe you’ll either make or ruin my day 🙂

