As most of you know I love Touch Portal and suggest it even over the Stream Deck. In this post I want to cover something simple, yet important. Many of you will notice when you open Touch Portal for the first time on your device you will have a black screen. Not only that but if you import a custom made page from a creator like myself you can’t figure out how to get it to show on your device! This is because you need to create navigation from one page to the next. Without creating navigation between pages you wont be able to access a different page.
If you would rather watch a video:
Setting up your Touch Portal Settings
We first want to take a look at your Touch Portal settings. Why? Well, it’s important we have something toggled to make our life easier as we setup pages on Touch Portal.
Open your Touch Portal application on your Desktop. Once you open the Touch Portal application go ahead and open the settings by clicking on the Cog Wheel on the top right of the application.
This should navigate you to your General Settings. If not make sure you go to your General Settings on Touch Portal. Here you will find an Option to “Create a go-to-main buttons for new pages.” This will automatically create navigation buttons for the new pages we create within Touch Portal. (Highlighted on the Right)
You will also notice the “Start at windows boot” and ” Start at boot minimized.” I suggest having both of these options enabled as well. This will start Touch Portal (minimized) every time you start your computer.
Setting up our Second Page
Now we are ready to create our second page. Let’s look at our Touch Portal Application:
Step 1: Lets go ahead and click on the “New” button on the top right of the Touch Portal App. This will bring up a window to Name a new page.
Step 2: Name the New Page ( Name it whatever you want )
This will open up a new page on the application. After the page is open you should see a button created automatically labled “Goto Main.” This button will navigate us from the new page back to the main page we were just on. That is why I suggested we toggle what I suggested earlier!
Setting up our Navigation on the Main Page
Now we are ready to setup the navigation from the Main Page to the New Page we just created. In order to reach the main page on your Touch Portal application make sure you click the drop down at the top and select (main).
If you hover over one of the empty spaces on touch portal this will highlight areas where buttons can be placed. We want to select the most bottom right button to navigate us from the Main Page to our new page. If you left click on that button it will open up the button settings!
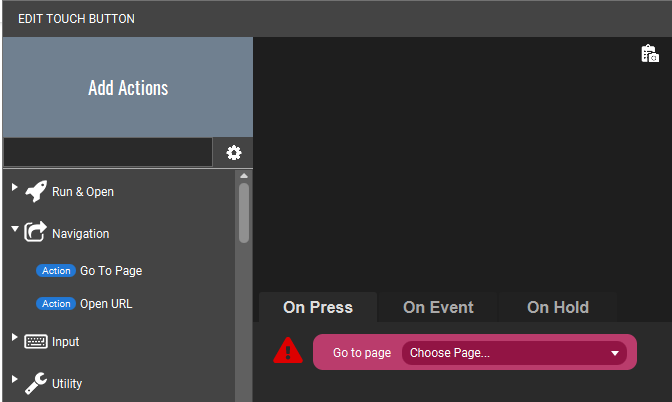
In the buttons settings you have quite a few options available. It’s important that you take a minute to understand what is on this page. On the left we have all the actions we can create within touch portal. In the middle are the different types of buttons we can create: On press, On Event, and On Hold. These buttons types allow for all kinds of different types of interactions and complex button configurations. On the Right are the default button settings.
For navigation buttons we want to remain on the On Press Tab. This will activate the actions on the tab when the button is pressed on our device.
To create a navigation button all we need to do is select the “Go to Page” action from the action menu on the left. It will generate setting in the On Press Tab regarding what page this button will navigate too. Let’s select the New Page we created earlier.
Last step in this process is to make the button have some sort of appearance.
You can do this by adjusting the settings on the right hand side of the “edit touch button” window.
After applying some button appearance changes hit “Save.”
You have successfully created a button to navigate from your Main Page to your new page! Congrats !! Here is a high five *high fives*


