AVerMedia Live Gamer 4K Capture Card Setup for Dual PC Streaming
AVerMedia continues to be the leader in innovation for Live Streaming Tech especially when it comes to Capture Cards. AVerMedia creates high-end products with the attention and focus on the performance, not the sell-ability or market-ability. The AVerMedia Live Gamer 4K is the industry leader in 4K Capture Card’s for Live Streaming. In this post we are going to cover all the ways you can setup a Live Gamer 4K for Dual PC Streaming.. and will talk about the BEST way to setup your Dual PC Streaming and why.
How To Install Your AVerMedia Live Gamer 4K
First and foremost we need to talk about WHERE you install your capture card. When you first get your new capture card you may be confused where you install it.
The AVerMedia Live Gamer 4K is an internal Capture Card. This means we will install it on the inside of our Streaming PC. The AVerMedia Live Gamer 4K has a PCIe interface.. meaning it gets installed in the Graphics Card slot of your Motherboard. So, before you do anything you may want to verify you have a motherboard with 2 PCIe slots, 1 for your Streaming PC Graphics Card and the 2nd for your Live Gamer 4K.
Ad Below Helps Fund The Site
Capture Methods
There are 3 ways you can Capture Video from your Gaming/Recording PC and Stream from the Capture Card on your Streaming PC.
Method 1 (Gaming Monitor Output):
Hook up an HDMI Cable from your Gaming/Recording Monitor and connect it into your Live Gamer 4K on the Streaming PC. This would capture all the content from the Gaming Monitor and send it to the Capture Card. This is not the most ideal method, however, its among the more simple setup methods for capturing video.
Method 2 (Duplicate Graphics Card Display):

Send a 2nd HDMI Cable out of your Gaming PC’s Graphics Card and connect it to your Capture Card on the Streaming PC. This would make your Gaming PC Recognize the Capture Card as a 2nd Monitor. This would also require you to change your Display settings to: Duplicate Display. This, again, is the not the most ideal method as it requires more GPU resources to run.
Method 3 (Pass-Through):
The beauty of the AVerMedia Live Gamer 4K is its Pass-Through capabilities. Low-latency pass-through is one of the major highlights of this capture card. This is the most ideal setup method for Dual PC Streaming, because it requires the least amount GPU resources, and maximizes the image capture quality. To do this you will send 1 HDMI Cable from your Gaming PC to the Capture Card on your Streaming PC. Then you will connect an HDMI to the Output of the Live Gamer and Input that into the Gaming Monitor you are using. Refer to the image below for an example:
Ad Below Helps Fund The Site
Stream Audio Setup
This is where things start to get a bit tricky… Setting up the Capture Card for capturing video is the easy part. Now, you must decide how you want to setup the audio for your stream. There are many many ways you can do this… there are also some tools you can use to make this easier. I am going to highlight 2 major methods with the audio setup of your new Capture Card for Dual PC Streaming.
 On the Gaming PC you will see a new audio source. This is a virtual audio source that the audio of your Capture Card will be capturing on the Streaming PC. You can find this source if you look at your Sound Control Panel -> Playback Devices -> AVT GC573
(or something similar). The question is, how do you get your sound from the Gaming PC to the Streaming PC?
I highly, highly recommend using an application called Voicemeeter. Voicemeeter will streamline this process making the setup of your new capture card seamless.
Without Voicemeeter, you will need to setup this new source as your default playback device on the PC. By doing so, you will lose audio to your headset or speakers.. But, the desktop audio will be traveling to the Live Gamer on your Stream PC.
We use Voicemeeter so we can still have audio on the Gaming PC, while still sending that audio over to Capture Card Source listed above. This will prevent latency issues for monitoring Video Game Audio. With Voicemeeter we are able to separate audio sources on both the Gaming PC (What you Hear) and the Stream PC (What the Stream will hear). This will optimize the audio quality of your streaming setup.
I will explain how I suggest setting up audio on both PC’s. If you have followed my setup guides for Voicemeeter everything will be seamless.
New to Voicemeeter? Check out this setup guide “How To Setup Voicemeeter Banana & Potato Correctly“
Ad Below Helps Fund The Site
Method 1 (Simple Method):
After you have Voicemeeter Installed on your Gaming PC. We are going to setup the Capture Card Audio Source as a Hardware Output on Voicemeeter.
This is how things will be setup:
Streaming PC:
Webcam
Microphone
Capture Card via Pass-thru
VBAN Communication Audio to Game PC
Gaming PC:
Headset/Speakers
Audio Hosted via Voicemeeter
Audio Sent to Capture Card via Hardware Output on Voicemeeter
 Voicemeeter -> Hardware Output’s (A1-A5 depending on version) -> Select the Capture Card Source
I wouldn’t set the Capture Card source up on A1, I would setup on the last Hardware Output you have available. For Voicemeeter Potato users that would be the A5 source.
A1 -> Select Main Device (Headphones/Speakers)
After setting up the A1 source we are now ready to send our Desktop audio to voicemeeter. To do this we need to navigate to the Sound Control Panel on our Computer. Navigation: Sound Settings -> Sound Control Panel -> Playback Devices -> Default Device -> Voicemeeter Input (VB-Audio Voicemeeter VAIO).
After you have done this, you will want to be sure the A1 button is toggled beneath the Virtual Input 1 on Voicemeeter. Now you will be able to hear your system sounds, and see them traveling through the application. Now, if you also toggle the A5 selection, or the Hardware Output selection you made for your Capture Card you will also send that audio to the Capture Card source.
Lastly, we will want to setup our communication audio for Discord, etc for when we are playing games with others. We will need to separate this audio on the Stream PC.. we can do this by setting the default communications device on the PC.
 Communication Audio:
Sound Settings -> Sound Control Panel -> Default Communication Audio -> Voicemeeter AUX Input (Voicemeeter AUX VAIO)
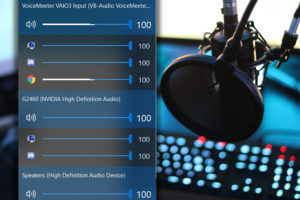
The Playback Devices should look like the images on the right.
In OBS:
New Source -> Audio Ouput Capture -> Select Voicemeeter AUX Input (Voicemeeter VAIO)
Now you will have Game PC Audio, and Communication Audio being captured on the Streaming PC within OBS.
The last step is to use VBAN to send Communication Audio back to the Gaming PC so you can hear your teammates. VBAN sends audio to other Voicemeeter Applications over an IP Network. Sounds a lot more confusing than it really is.
Voicemeeter Stream PC:
Voicemeeter -> Voicemeeter AUX Input (Virtual Input 2) -> Toggle B3
VBAN Stream PC:
Stream PC -> Voicemeeter -> VBAN (Button Top of App) -> Toggle On VBAN (Button Top Left) -> Outgoing Streams -> Toggle On -> Source = B3 -> Stream Name = Communication -> IP Address To: (IP Address of Game PC)
VBAN Game PC:
Game PC -> Voicemeeter -> VBAN -> Toggle On VBAN (button Top Left) -> Incoming Streams -> Toggle On -> Stream Name = Communication -> IP Address From: (IP of Stream PC) -> Destination = Virtual In #2 (Voicemeeter AUX Input)
Now, audio will be traveling to your main output source and to the capture card on the Streaming PC. You can use the Voicemeeter on your Gaming PC as a Virtual Mixer to control audio levels of each source if you separate the audio sources by following my Voicemeeter Setup Guide.
Ad Below Helps Fund The Site
Method 2 (Advanced Setup Voicemeeter Potato Suggested):
The advanced method I use is setup to optimize the audio of your stream. This method will help us separate all audio sources on both the Gaming PC and the Streaming PC allowing us to have higher audio quality and give us the ability to apply filters to each audio source within OBS.
This is how things will be setup differently from Method 1:
Streaming PC:
Music Audio
Browser Audio VBAN from Game PC
(Optional) VBAN Music Audio to/from Game PC
Gaming PC:
Headset/Speakers
Game/Desktop Audio to Capture Card
Music Audio Either separate or VBAN’d to/from Stream PC
Browser Audio VBAN’d to Stream PC
As you can see the only real difference in this method is the addition of two more Audio Sources. To accomplish this we will be adding the Virtual Audio Cable into the Equation. The Virtual Audio Cable will allow us to separate our Browser audio. And, we will also separate the Music Audio utilizing our 3rd Virtual Input on Voicemeeter Potato.
In order to route audio sources on our PC we will need EarTrumpet (better than Windows 10 Apps and Device Preferences). EarTrumpet will allow us to send Browser Audio to the Virtual Audio Cable and Music audio to the VAIO3 Input.
What to download:
Virtual Audio Cable – Stream PC & Game PC
EarTrumpet – Stream PC & Game PC
Game PC Setup:
Browser Audio (With audio playing on Browser)
Step 1: Voicemeeter -> Hardware Input 2 -> Select Cable Output (VB-Audio Virtual Audio Cable) -> Toggle B3
Step 2: Open Hidden Apps -> EarTrumpet -> Locate Browser Audio Source -> Right-Click -> Click Double Arrow -> Select Cable (VB-Audio Virtual Cable)
Step 3: VBAN -> Outgoing Streams -> Toggle on -> Source B3 -> Stream Name = Browser -> IP Address to: (IP of Stream PC)
Music Audio (With Music App playing audio)
Step 1: Open hidden apps -> EarTrumpet -> Locate Music Audio -> Right-click -> Click Double Arrow -> Select Voicemeeter VAIO3 Input (VB-Audio Voicemeeter VAIO3)
Step 2 (Optional): VBAN Music audio from VAIO 3 to Stream PC.
Streaming PC Setup:
Browser Audio
Step 1: Voicemeeter -> Hardware Input 2 -> Cable (VB-Audio Virtual Cable)
Step 2: VBAN -> Incoming Streams -> Toggle On -> Stream Name = Browser -> IP Address From: (IP Address of Game PC) -> Destination = In #2
Step 3: OBS -> New Source -> Audio Output Capture -> Cable (VB-Audio Virtual Cable)
Music Audio (With Music App playing audio)
Step 1: Open hidden apps -> EarTrumpet -> Locate Music Audio -> Right-click -> Click Double Arrow -> Select Voicemeeter VAIO3 Input (VB-Audio Voicemeeter VAIO3)
Step 2 (Optional): VBAN Music audio to/from VAIO 3 to Stream PC.
Step 3: OBS -> New Source -> Audio Output Capture -> Voicemeeter VAIO3 Input (VB-Audio Voicemeeter VAIO3)
Ad Below Help Fund This Site
That concludes the Dual PC Setup with your AVerMedia LiveGamer 4K Capture Card. I hope you enjoyed the article! If you have any questions feel free to reach out in my Discord Server or the Comments below!


