We all know what Discord is (Guilded’s problematic older sibling haha), so let’s get right to it. To start with, get to the Discord user settings by clicking the gear icon in the lower-left, near your profile name. From there, you’ll want to select the “Voice & Video” option found about halfway down the list, under the App Settings heading. Once you’re in that section, we’re ready to make big changes! Let’s start with the easiest of the five settings and one we’ve covered in a previous post. Still a very important setting to learn about, so we’re covering it here too!
1 – The first setting to change is the built-in noise gate that Discord offers; the input sensitivity toggle and adjusting the slider bar. As you can see from the animation below, you’ll want to turn off the automatic input sensitivity and adjust the slider bar until your voice passes into the green but all other background noises remain within the orange/yellow.

2 – The second option to adjust is the noise suppression setting, found within the ‘Advanced’ section of the Voice & Video settings. We strongly suggest setting up your own actual noise gate/suppression feature for your microphone via Equalizer APO, the setup for which can be found here. If you have your own filter set up for noise suppression, there is no reason to use this one found within Discord. Also if you already use VoiceMeeter, then ensure this option is disabled as it can cause problems. If you don’t use VoiceMeeter, then you really should! It is a feature-packed program that gives you nearly complete control over your audio. The setup for that can be found here.
3 – The next setting to turn off is one most people tend to keep on and it causes problems without them realizing it. Before I tell you about it, let me ask you this; have you ever been on a Discord call and someone’s audio always seems to clip off the last word they say? Maybe others have mentioned that it happens when you speak? It can get aggravating after a while, right? Well, that’s because of a certain setting found under the ‘Voice Processing’ heading in the ‘Voice & Video’ section. That setting is the ‘echo cancellation’ and ‘noise reduction’ option. Turning these off will stop the voice clipping. Also, for those of you using VoiceMeeter, having this on can cause robotic/static voice issues within Discord. If you’re serious about audio quality of your microphone, setting up proper filters as discussed in the above section can improve quality in even the cheapest of microphones.
4 – Automatic gain control is a setting that you can either leave on or off. What it will do is try to gauge the volume of your microphone will hit to automatically increase or decrease the input volume for you. Again, if you have proper filters set up, this option is completely unnecessary to keep enabled and even if you’ve just manually adjusted the noise gate setting spoken of in section #1 above, this isn’t really required. Another setting I’ll group in with this section is the ‘Quality of Service’ option. This is another setting that may or may not be of benefit to have enabled, but as the warning on the setting states, some routers or ISPs in general may have issues with this setting being enabled, so if you’re trying to troubleshoot an unknown Discord problem, maybe this option is to blame. The alternative for Quality of Service is to set it up at the router level, which most routers available for home use now have this setting built in. Refer to your manufacturer instructions for more details on that, or stop by our Discord server where a community of volunteers not too unlike yourself will be more than happy to help answer any questions.
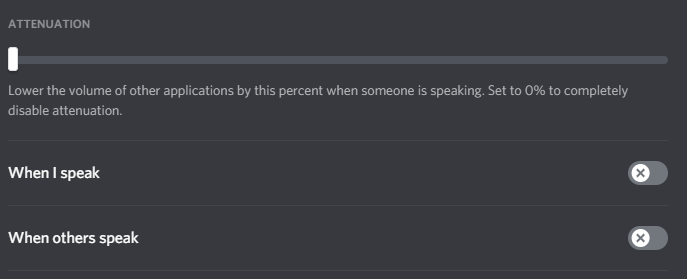
5 – The final setting to play around with is something called ‘Attenuation’ which is found directly beneath the Quality of Service option just discussed. Some of you might be more familiar with the term ‘ducking’, which is what this setting controls. Ducking/Attenuation is what causes the volume of other applications like games or videos to lower their volume when either you or others are speaking. Most people might keep the option for lowering it when others speak enabled, but lowering the volume when you are speaking isn’t really necessary for most people. As you can see from the image below, setting it to 0%/sliding the bar all the way to the left will disable attenuation completely.
6 – That’s right, folks. We said five, but we’re giving you SIX! Yes, SIX settings. We’re having so much fun right now, we just have to keep this party going. Now directly below the ‘Attenuation’ setting is a dropdown labeled ‘Audio Subsystem’ with two options; standard and legacy. If you’re having unknown issues with Discord or some type of device compatibility conflict and turning off the Quality of Service setting didn’t seem to make a difference, try changing this option. You should restart Discord after changing that option though. Also we’ll discuss very briefly the 3 options below that, the ‘Screen Share’ and ‘Voice Diagnostics’ settings. These should typically be enabled, but if you end up having issues with screen or audio sharing, experiment with these settings and see if you can’t fix it. Again, we do have a Discord server where we would be most happy to help you solve your issues.
But if you’re really that fed up with Discord over your troubles, why not check out Guilded? We have a server there too! What is Guilded? It’s better than Discord, is what. We have a video and an accompanying blog post breaking it down for you too.
We covered a lot very quickly, so let’s review. The noise gate feature built into Discord is a very workable solution if you want to block out computer noises or the sound of your mechanical keyboard or mouse while you’re in a call. Noise suppression is an option you can use, but it’s best to set up your own microphone filters with Equalizer APO following this setup guide. You’ll get a more professional sound from your mic and solve other audio issues you might not even know you had! Also worth checking out is VoiceMeeter if you haven’t yet. Watch the setup video here!
Remember to turn off echo cancellation and noise reduction to help with the clipping of the voice, as having the options enabled tends to clip off the last spoken word. Automatic Gain Control and Quality of Service settings are up to you whether you want them enabled, but typically turning them off will have no ill effect. The same goes for Attenuation, another setting which is personal preference. And for any unresolved audio issues within Discord, try changing the Audio Subsystem setting from Standard to Legacy or vice versa. Just remember to restart Discord afterward. One more thing to keep in mind is that Discord has a way of putting these settings back to their original defaults after program updates, so make sure you refer back to this article to double-check those settings after any application updates.
That’s it for now! If this was of help to you, remember to subscribe to the YouTube channel for more video tutorials on audio programs like VoiceMeeter and Equalizer APO, updates on why Guilded is so much better than Discord or a veritable cornucopia of other topics. Anything not answered there can be answered by our helpful community of volunteers in either the Discord or Guilded servers. Not having issues? Stop on in and say hi! We always love the support.
Have you already tried to fix some issues yourself, but you just don’t have the technical mindset to truly grasp what’s happening? Maybe you need some help bringing your imagination to life because you’re not very artistic or knowledgeable with Photoshop or the other big programs out there? Have big ideas for graphics or videos but don’t have the ability or knowledge to edit them? Let us do it for you! For a very reasonable fee, you can receive assistance on graphic design, audio engineering and/or video editing! Stop by the Hire A Pro page today and let’s bring your future plans to life!

