It’s 2021 and technology is advancing at a quick rate. However, Noise Suppression is something that drives me bonkers. You may or may not expect me to say this, but you really shouldn’t use noise suppression. Whether thats Krisp or NVIDIA Voice, just don’t do it.
When should you use Noise Suppression?
When you should:
– In noisy environments where you can not remove the noises. For example, one of our moderators is a web server engineer. Often, he is on work calls within the server without sound treatment and this is hard to remove with a Noise Gate or Downward Expander.
– When using microphones with poor quality or omni-directional polar pattern where noise can’t be removed without a noise suppression filter. (On-board laptop mics, webcam mics, etc.) We want to note that expectation of the sound vs the actual sound may be different. Meaning you may be expecting clear and flawless audio from equipment that won’t achieve that goal. Sometimes the background audio is better to leave in the mix instead of worsening your audio with artifacts from the noise suppression.
When you shouldn’t:
– Every other time.
Noise suppression filters have a higher chance of creating what we call [su_tooltip title=”Audio Artifact” text=”Any unwanted sound in a mix such as: clicks, ticks, pops, crackles, warping, or similar. This can either be created by the recording or the processing of the audio information.” shadow=”yes”]audio artifacts[/su_tooltip]. An audio artifact is something that is often accidental, but more importantly, it’s not wanted in the mix. Audio artifacts sound awful.
The more work that the noise suppression filter has to do, the more artifacts it will create. If you are in a noisy environment and the noise suppression is working really hard to remove those sounds.. the artifacts will be prominent in the mix. This will damage your vocals, disrupt the listener, and make the mix more harsh overall.
-> [su_lightbox src=”https://www.youtube.com/watch?v=OPBxz-njUAg”]Click here for example of Audio Artifacts[/su_lightbox]
The good news is that you don’t have to use noise suppression to remove unwanted sounds from your mix. You can manage to get high quality sound and reduce unwanted noise without a noise suppression filter on your mic. It simply requires you to make some basic “fixes” to your mic.
Ad below helps fund the site
Step 1 – Mic Positioning
Let’s first start by making sure our microphone is positioned correctly. Depending on the type of mic you have you will need to position it differently. You can search your mic on google and ask what type of mic your mic is.
Condenser Mic – Needs to be within 3-5 inches of your mouth pointed directly at your mouth
Dynamic Mic – Needs to be within a few inches of your mouth pointed directly at your mouth
To achieve this you will most likely need a Boom Arm. You can find equipment we suggest for streamers and content creators on this article.
Laptop mics, webcam mics, and other built-in microphones are often omni-directional mics. These omni-directional mics are sensitive to sound from every angle. That is why they pick up every sound that is in your environment. These mics sometimes need help from noise suppression. But, we want you to understand that noise suppression sometimes can do even more damage than keeping the background noise in the mix.. we will cover this later in the Noise Suppression section.
Now that you have positioned your microphone you may notice a decrease in unwanted noises. This is the first step in resolving this issue. It’s also the first step in setting up your microphone correctly.
The next step is to get set up with filters for you microphone to help eliminate those sounds from the output mix.
Ad below helps fund the site
Step 2 – Mic Filters
To remove any sounds that may still be in the background of the mix we are going to use either a [su_tooltip title=”Noise Gate” text=”A Noise Gate is an electronic device or software that controls the output by setting the lowest decibel value of an audio signal. ” position=”right” shadow=”yes”]Noise Gate[/su_tooltip] or [su_tooltip title=”Downward Expander” text=”A Downward Expander, and other expanders, extend the dynamic range in an audio signal. ” position=”right” shadow=”yes”]Downward Expander[/su_tooltip]
I’m going to assume, since you are using noise suppression, you don’t have equipment or software to use a noise gate or downward expander currently. I want to keep this as simple as possible while still driving home the important information.
To set up a Noise Gate or Downward Expander you will need what is called a [su_tooltip title=”VST Plugin” text=”VST or Virtual Studio Technology is an audio plug-in software interface that integrates software made to manipulate and adjust an audio signal.” position=”right” shadow=”yes”]VST Plugin.[/su_tooltip] VST stands for Virtual Studio Technology. VST Plugins is software made to help us manipulate our audio signal. They are most often used in Audio Production, but you can use them to process a live audio signal (the audio from your mic as its being streamed to the PC).
In order to use these VST Plugins we will need some way to host them. We can use a VST Host or even something like Equalizer APO which is an Audio Processing Object… If you don’t know what that means it’s okay not many do. What’s important is that you know how to set up this for yourself in the way that best suites you.
I typically suggest using Equalizer APO because it requires less technical know-how making it easier to start with and get started. The downside of using Equalizer APO is the lack of a live feed on the app, making the VST Plugin displays not functional. This makes it slightly harder when editing your audio live. I find it easier to add the plugins onto the microphone source using OBS and then add the same filters and their settings into Equalizer APO after you have it setup.
If you are interested in setting up Equalizer APO you can watch this video.
The beginning portion of the video is what you need as it will walk you through installing APO onto your microphone.
Learn about the Noise Gate below.
Noise Gate
To keep this from getting too wordy I’m going to quickly cover setting up a Noise Gate filter. We suggest the reafir or reaper plugins which includes a “reagate” (Noise Gate).
You will notice there are 3 main parameters on a Noise Gate.
Paramaters:
– Attack
– Release
– Threshold
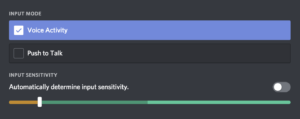
These are very easy to understand, and even easier if you are monitoring your audio on a live feed in OBS or a VST host with the noise gate plugin. So, add your mic as a source in OBS and add a “VST Plugin” filter by right-clicking the source and going to filters.. then selecting the reagate you downloaded before.
Threshold
The easiest way to remove those unwanted noises is by sliding the threshold above the static noises that are being picked up without you speaking into the mic. If you slide your threshold above that it will mute that audio on the output of the mix. Just be careful not to slide it too high as it will cut in and out of your voice. If you have your mic setup correctly you should be able to have your threshold as high as -25db.
Attack
The attack is measured in “ms” because it is the amount of time is takes for this noise gate to open when the audio signal exceed the threshold we set before. The higher attack setting you have the longer/more fade-in the audio will have.
Release
The release is the opposite of the attack.. It set’s how quickly the audio signal get muted after it drops below the threshold we have set. The longer release the more fade-out the audio signal will have.